 Kpali
KpaliGuide
Buy a travel eSIM
Destination, plan, pay, QR, My eSIMs.
Are you traveling and need an eSIM before you land? Data for where you are going, ready before you land.
An eSIM bought the night before a flight is worth more than one bought in an arrivals hall, and costs less. The whole point is to land already connected.
This walkthrough goes from installing Kpali to holding a QR code you can install whenever you like.
Step by step
- Install Kpali. The Android package is
app.kpali; Kpali is on the App Store for iPhone. There is no browser version — money screens gate on the device. - Fund store credit. Open Add money. Choose USDT or USDC, then the network — TRC-20 credits after twenty confirmations, BEP-20 after fifteen. The warning about the network is above the address because sending on the wrong chain cannot be undone by anyone. The minimum is shown before the address.
- Decide whose credit this is. Your email in the email field notifies you. Somebody else's email credits them instead, and they are told when it lands.
- Wait for Home. Store credit appears when the deposit confirms. An address is not money.
- Set the country. The country decides what the catalogue can sell. Home is where it starts.
- Open Travel eSIM. Home → eSIM → destination → plan → Pay → My eSIMs → install QR.
- Enter the recipient. Your device (QR / activation code). There is no lookup for this product, so read it back carefully.
- Read the review sheet. It states the recipient and what leaves your wallet, fee included, before anything is charged.
- Pay. If store credit cannot cover the amount plus the fee, Pay does not proceed and nothing is sent to a provider.
- Keep the receipt. A QR code and an activation code on the receipt, and the pack itself under My eSIMs.
What to expect
My eSIMs is the workspace: every pack, the data used against it, and how long it is valid. Packs stay visible after they expire, so a trip taken last year is still explicable. The receipt keeps the QR and the activation code in case the pack is installed on a different device.
Outright failure means the debit is reversed with a plain statement. An unsettled order means wait, not retry. On this walkthrough that matters at the last step: once you have paid for travel esim, the receipt is the thing to read, not the Pay button to press again.
What goes wrong
- Buying for the country you are leaving instead of the one you are going to.
- Choosing a plan whose validity is shorter than the trip.
- Assuming the phone supports eSIM without checking that it is also network-unlocked.
- Leaving installation until you land, when there is no data to open the app with.
What you will see
The captures below are the genuine article — the same screens the app draws on a phone. These are the screens this page refers to when it says buy a travel esim. Both the light and the dark theme appear, because the app follows your phone.
- Kpali travel eSIM country list with flags and starting prices (light theme)
- Kpali travel eSIM destinations in dark mode with prices per country (dark theme)
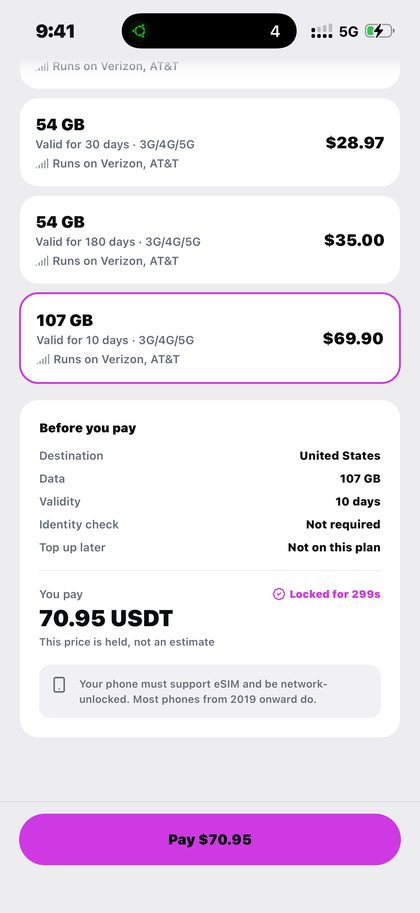
- Kpali eSIM plans for the United States with data, validity and price before you pay (light theme)
- Kpali eSIM plans for Hong Kong in dark mode (dark theme)
- A completed Kpali eSIM receipt with the install QR code (light theme)
- A delivered Kpali eSIM receipt in dark mode with the install QR code (dark theme)
A worked example
A worked example. You fly to Germany on Friday. On Wednesday evening, at home on wi-fi, you open Kpali, choose Germany, and read the plan list against the length of your trip rather than against price alone — a plan whose validity ends before you fly home is a false economy. You pay, and the app hands you a QR. You install it there and then, turn Data Roaming on for that line, set Cellular Data to it, and leave Network Selection on Automatic. The line reads No Service, which is correct and means nothing. Nothing has been consumed, because the clock starts on first connection in Germany. You land on Friday, the eSIM attaches, and you are online before you reach the baggage hall.
If it does not work
The QR will not scan. You cannot scan a code with the phone that is displaying it. Use Install on this phone, or point a second device at the screen.
Installed, but no data. Turn Data Roaming on for the eSIM line, set Cellular Data to that line, and leave Network Selection on Automatic with no hand-typed APN.
The line says No Service. Normal on a data-only plan. Turn Wi-Fi off and load a page — that is the real test, not the status label.
The plan shows as not started. It has not connected in the covered country yet. That is correct behaviour and costs you nothing.
The phone will not accept the eSIM at all. It needs eSIM support and it needs to be network-unlocked. Most handsets from 2019 onward qualify, but a locked phone will refuse regardless of age.
Worth knowing
A last note on timing. The best moment to buy an eSIM is the evening before you fly, on your own wi-fi, with the phone plugged in and no pressure. Everything about the product is designed to make that possible: nothing is consumed by buying early, nothing is consumed by installing early, and the only clock that matters does not start until you are actually in the country.
Where this works
Nigeria, the United States, Hong Kong, Germany, the United Kingdom and Kenya are frequent destinations; the destination list covers far more. Coverage for travel esim is decided per country and shown before you pay, so you find out what is possible while you are still choosing rather than after you have committed. Where it cannot be delivered today, the app says so with a reason attached.
The full picture — who it suits, what decides availability, what it costs and every question people ask — is on the Travel eSIM page.
Buy a travel eSIM. Destination, plan, pay, QR, My eSIMs.
Kpali takes no card details on this website, ever. The one payment it takes is a naira bank transfer for store credit, on /store-credit/. A page asking for a card number for Kpali is not us.
Admin URLs are intentionally absent from navigation, sitemaps and robots allow-lists.
When Claude finishes the completeness wave, real device screenshots replace the token-built phone frames without changing the red circle targets.
Download Kpali from Google Play (package app.kpali) or the App Store (id 6802318301).
Create an account. You do not need a local bank account to start.
Open Add money. Read the network warning above the address. Enter the amount. The minimum is stated before you copy.
Enter an email: yours to be notified, or theirs if this deposit should credit another person.
Send the crypto on the stated network. Wait until Home shows store credit. An address is not money.
Set the country to Algeria.
Open Airtime. Home → country → Airtime → network → number → amount → Pay.
Confirm a mobile number on the review sheet. Pay is blocked if the balance cannot cover it.
Keep the receipt. Receipt + History show the number, network, amount and status.
If status is Checking, do not retry. Read the receipt. Support is email and WhatsApp.