 Kpali
KpaliGuide
Pay school or exam fees
Institution account and a receipt you can forward.
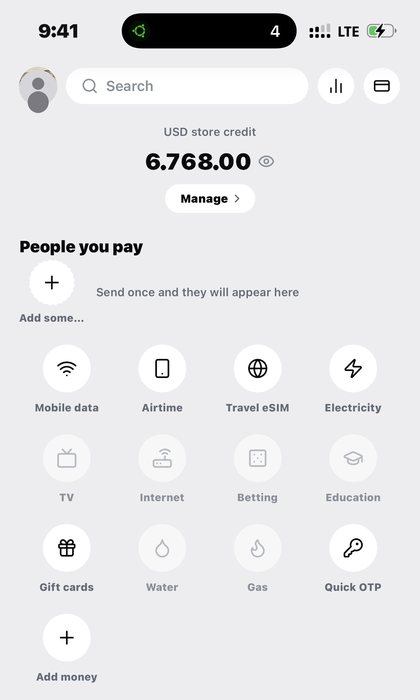
Are you paying school or exam fees from another country? School and exam payments, against the institution's account.
School and exam payments are judged by their paperwork. The payment matters; the receipt that proves it matters just as much.
This guide gets you to a document a bursar can reconcile.
Step by step
- Install Kpali. The Android package is
app.kpali; Kpali is on the App Store for iPhone. There is no browser version — money screens gate on the device. - Fund store credit. Open Add money. Choose USDT or USDC, then the network — TRC-20 credits after twenty confirmations, BEP-20 after fifteen. The warning about the network is above the address because sending on the wrong chain cannot be undone by anyone. The minimum is shown before the address.
- Decide whose credit this is. Your email in the email field notifies you. Somebody else's email credits them instead, and they are told when it lands.
- Wait for Home. Store credit appears when the deposit confirms. An address is not money.
- Set the country. The country decides what the catalogue can sell. Home is where it starts.
- Open Education. Home → country → Education → institution → account → lookup → Pay.
- Enter the recipient. The institution account, and the student ID where one is required, are looked up before payment so the money lands on the right record.
- Read the review sheet. It states the recipient and what leaves your wallet, fee included, before anything is charged.
- Pay. If store credit cannot cover the amount plus the fee, Pay does not proceed and nothing is sent to a provider.
- Keep the receipt. A receipt built to be forwarded — the institution, the account, the amount and the state.
What to expect
The receipt is the proof you send to the school. It is the deliverable, not a side effect. History keeps the payment against the institution. Store credit moves by the amount plus the fee.
If it fails definitively, the debit is reversed and the receipt states that plainly. If it is still being checked, leave it: a second attempt can become a second charge. On this walkthrough that matters at the last step: once you have paid for education, the receipt is the thing to read, not the Pay button to press again.
What goes wrong
- Using a student ID from a session the institution has retired.
- Leaving it to the deadline when reconciliation runs on the institution's own cycle.
- Paying against a name that does not match the student.
- Treating the receipt as disposable.
A worked example
A worked example. Term fees are due and you are in another country. You open Education, choose the institution, and enter the account or student ID the bursar is currently billing on, confirming with them first if the last one was from a previous session. The name comes back matching the student. You pay, then use Download receipt and forward it. The receipt carries the institution, the reference, the amount and the timestamps — everything a bursar reconciles against, in one document.
If it does not work
The student ID is not recognised. It may be from a session the institution has retired. Confirm the current reference with the bursar.
The institution is not listed. It cannot be paid through the catalogue today.
The school says it has not received it. Institutions reconcile on their own schedule. Forward the receipt — it carries the reference they need.
The returned name does not match the student. Do not pay. Check the reference.
Pay is blocked. Fees plus the fee exceed your store credit.
Where this works
School and exam payments run wherever the catalogue carries an institution. Coverage for education is decided per country and shown before you pay, so you find out what is possible while you are still choosing rather than after you have committed. Where it cannot be delivered today, the app says so with a reason attached.
The full picture — who it suits, what decides availability, what it costs and every question people ask — is on the Education page.
Pay school or exam fees. Institution account and a receipt you can forward.
Kpali takes no card details on this website, ever. The one payment it takes is a naira bank transfer for store credit, on /store-credit/. A page asking for a card number for Kpali is not us.
Admin URLs are intentionally absent from navigation, sitemaps and robots allow-lists.
When Claude finishes the completeness wave, real device screenshots replace the token-built phone frames without changing the red circle targets.
Download Kpali from Google Play (package app.kpali) or the App Store (id 6802318301).
Create an account. You do not need a local bank account to start.
Open Add money. Read the network warning above the address. Enter the amount. The minimum is stated before you copy.
Enter an email: yours to be notified, or theirs if this deposit should credit another person.
Send the crypto on the stated network. Wait until Home shows store credit. An address is not money.
Set the country to Algeria.
Open Airtime. Home → country → Airtime → network → number → amount → Pay.
Confirm a mobile number on the review sheet. Pay is blocked if the balance cannot cover it.
Keep the receipt. Receipt + History show the number, network, amount and status.
If status is Checking, do not retry. Read the receipt. Support is email and WhatsApp.