 Kpali
KpaliGuide
Install an eSIM
QR / activation after a successful purchase.
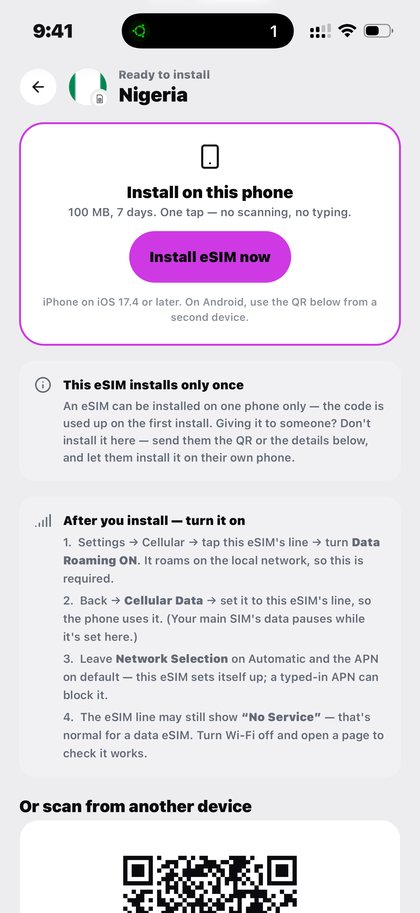
Installing is the step between buying an eSIM and having data. It takes about a minute, and four settings decide whether it works.
Step by step
- Open the eSIM from My eSIMs or its receipt. Both carry the same QR and activation code.
- Tap Install on this phone. One tap, no scanning and no typing. If you are installing on a second device, point that device's camera at the QR instead — you cannot scan a code with the phone displaying it.
- Or enter it by hand. The SM-DP+ address, the activation code and the ICCID are all on the screen to be copied if a manual setup is needed.
- Turn Data Roaming on for the eSIM line. Settings, Cellular, tap the eSIM's line, turn Data Roaming on. It roams onto the local network, so this is required.
- Set Cellular Data to the eSIM line. Your main SIM's data pauses while the eSIM carries the traffic. Your normal number stays reachable.
- Leave Network Selection on Automatic. And leave the APN alone unless the app tells you otherwise. A typed-in APN from an old setup is a common cause of a dead eSIM.
What to expect
An eSIM installs once. If it is meant for somebody else, send them the QR before installing it yourself.
The line may still read No Service. On a data-only eSIM that is normal — turn Wi-Fi off and open a page to check whether data is actually flowing.
The validity clock has not started yet. It starts when the eSIM first connects to a network in the country it covers, so installing at home on wi-fi costs you nothing.
What goes wrong
- Trying to scan the QR with the phone that is displaying it.
- Leaving Data Roaming off.
- Installing it twice, or installing a gift meant for somebody else.
- Judging it by the No Service label rather than by whether a page loads.
Why this matters
Installation is where most eSIM confusion happens, and almost all of it comes from expecting an eSIM to behave like a plastic SIM.
It does not. It installs once and only once, which is why sending it to somebody else means sending the QR before you install it. It needs Data Roaming switched on, because roaming onto the local network is precisely what it is for. And it will often report No Service on a data-only plan, which looks alarming and means nothing — the test is whether a page loads with Wi-Fi off, not what the status bar says.
The reassuring part: none of this consumes your plan. The validity clock starts when the eSIM first connects to a network in the country it covers, so you can buy days ahead, install at home on Wi-Fi, and arrive with everything already done.
What you will see
These are the actual screens, captured from the app rather than drawn for this website. These are the screens this page refers to when it says install an esim. Both the light and the dark theme appear, because the app follows your phone.
- Installing a Kpali eSIM for Nigeria on this phone with one tap (light theme)
- Installing a Kpali eSIM for the United States in dark mode (dark theme)
- Kpali eSIM QR code with the SM-DP address and activation code to enter by hand (light theme)
Questions
Can I scan the QR with the phone showing it?
No. Use Install on this phone instead, or point a second device at the screen.
Why does it say No Service?
On a data-only eSIM that is normal. Turn Wi-Fi off and open a page to see whether data is flowing.
Do I lose my normal number?
No. The eSIM is a second line carrying data; your usual SIM stays reachable.
Can I install it later?
Yes, and installing early costs you nothing: the clock is started by the first connection in the covered country, not by the install.
Everything else about this family — coverage, cost, and the questions people ask most — is on the Travel eSIM page.
Read next
- Buy a travel eSIM — destination, plan, pay, QR
- Track eSIM usage — why every pack is tracked on its own row
- Read a receipt — the three states, and why one of them means do nothing
- Get support — the questions answered in full, and the path to a person
Every guide here describes the app. The one thing this website sells is store credit, by bank transfer, on kpali.app/store-credit/.
This guide describes the app. The one page here that takes payment is store credit by bank transfer; no page asks for a card.
Install an eSIM. QR / activation after a successful purchase.
Kpali takes no card details on this website, ever. The one payment it takes is a naira bank transfer for store credit, on /store-credit/. A page asking for a card number for Kpali is not us.
Admin URLs are intentionally absent from navigation, sitemaps and robots allow-lists.
When Claude finishes the completeness wave, real device screenshots replace the token-built phone frames without changing the red circle targets.
Download Kpali from Google Play (package app.kpali) or the App Store (id 6802318301).
Create an account. You do not need a local bank account to start.
Open Add money. Read the network warning above the address. Enter the amount. The minimum is stated before you copy.
Enter an email: yours to be notified, or theirs if this deposit should credit another person.
Send the crypto on the stated network. Wait until Home shows store credit. An address is not money.
Set the country to Algeria.
Open Airtime. Home → country → Airtime → network → number → amount → Pay.
Confirm a mobile number on the review sheet. Pay is blocked if the balance cannot cover it.
Keep the receipt. Receipt + History show the number, network, amount and status.
If status is Checking, do not retry. Read the receipt. Support is email and WhatsApp.